EAs & Backtesting
In this lesson we will examine:
– How to write a brief for a developer for your EA
– How to visually backtest indicators
– How to backtest EAs
In the previous two chapters, we have looked at some advanced features of MT4 and creating a trading system. We will now look at how to use this knowledge to create and backtest an Expert Advisor.
Creating EA Specifications
Let’s assume that you have created a trading system and now want to create an Expert Advisor. You may wish to auto-trade your strategy, or may just want to backtest the system for manual trading.
To create an EA, you need to create a list of parameters and logic for the system. This is useful if you are coding your own system, and is necessary if you are hiring a developer, because doing so will ensure that the developer has a proper brief. It will also mean that the EA has all the parameters you need to conduct backtesting.
Let’s look at a simple trend following system. Please note, this is for example purposes only, and is not an endorsement of this trading system.
Long Trade
5 Ema crosses above 10 Ema and RSI (10) is above the 50 level.
Short Trade
5 Ema crosses below 10 Ema and RSI (10) is below the 50 level.
Take Profit = 300 pips
Stop Loss = 50 pips
Additional Logic:
- Trailing Stop applied every 50 pips. If the trade is 50 pips in profit, the Stop Loss will be moved to breakeven. If the profit is 100 pips, then Stop Loss is moved to +50 pips of guaranteed profit and so on.
- Trades might be closed before hitting TP or SL if a contrary signal takes place. For example, you are in a long position and there is a signal to go short, the current trade is closed and a new sell is opened.
Parameters:
Lot_Size: Number of lots to trade. Default 0.1
Ema_Period_1: Period of the short term Exponential moving average. Default 5
Ema_Period_2: Period of the long term Exponential moving average. Default 10
Take_Profit: Number of pips to set as the Maximum Profit Target. Default 300 pips
Stop_Loss: Number of pips to set as the Stop Loss level. Default 50 pips
Trailing_Stop: Trailing stop distance in pips. Default 50 pips
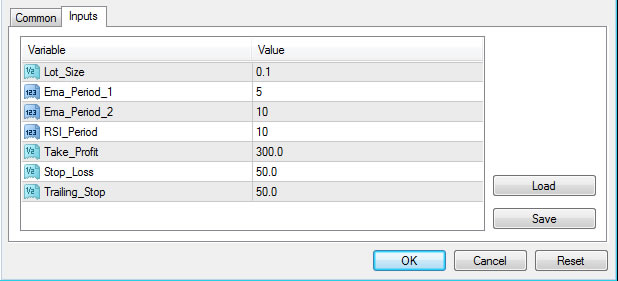
Final EA Parameters
This is what the parameters of the EA for this strategy look like in MT4:
 Strategy Tester Overview
Once your strategy is programmed into an EA, you will be able to view the final results by installing it and opening it in the Strategy Tester.
Before using the Strategy Tester, ensure that the EA you want to test is installed. You can do this by going to: File > Open Data Folder from the top menu.
From there, open MQL4 > Experts and drag your EA file into that folder.
Now hold the Ctrl button on your keyboard and press N to open the Navigator. Right click on any indicator or EA and select “Refresh”. Your EA will now be installed.
Hold the Ctrl button on your keyboard and press R to open the Strategy Tester (note: this feature isn’t available in the mobile version of MT4).
The Strategy Tester window will appear at the bottom of your screen.
Strategy Tester Settings
The Strategy Tester is now shown as in the screenshot below (please click the image to expand it):

Tip: There are many features and functions of the Strategy Tester. If you haven’t already done so, we recommend you watch the video at the top of this page to get a better understanding of the interface.
In the first box, select your EA from the dropdown list.
- Symbol: Select the symbol that you want to backtest on (e.g. EURUSDm).
- Model: Use the default Every tick setting.
- Use Date: Leave this box checked and select the From and To dates that you want to use for this test. If you leave the box unchecked then all the test data available will be used.
- Visual mode: This allows you to view the trades of your EA. You can speed up or slow down the chart speed using the bar to the right of the check box, and can also pause the test using the button to the right of the bar..
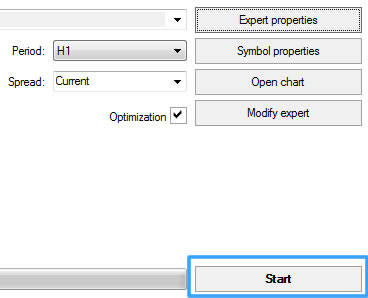
- Period: Select the time frame of the chart that you want to test from, using the dropdown list.
- Spread: This allows you to change the default spread for the backtest. “Current” will use the live spread when you press the “Start” button. Note: Spreads will be higher than normal on weekends, so bear this in mind when testing when the markets are closed.
- Expert properties button: Click on this button to change the settings of the EA.
- Symbol properties button: This shows the specifications of the instrument you are testing on.
- Open chart: This allows you to view the chart you just tested on if you weren’t using Visual mode.
- Modify expert: This is used to modify the source code of the selected indicator/EA.
- Optimization: This allows you to optimize the settings of your EA, or change the parameters of an indicator you are visually testing.
Data Quality
Before we proceed with looking at backtesting, it is important to first mention the quality of data needed for accurate and reliable backtests.
By default, the data used in the MT4 Strategy Tester is one minute data from the MetaQuotes servers. This is not high quality enough and, as such, testing on this is largely a waste of time.
To get the best possible data, there are two options that most traders choose from: Tickstory and Tick Data Suite.
If you only want to backtest on Forex, then the Standard Tickstory package will be the best option.
On the other hand, if you want to backtest on Forex and CFDs, you would need to sign up for Tick Data Suite. This is because the volume data from Tickstory causes MT4 to be unable to process the backtest.
Both of these companies provide comprehensive documentation for downloading and installing MT4 tester history files, so please consult the guides on their websites:
Performing a Backtest
Once you have downloaded and installed the testing data for the instruments you wish to test, you are now ready to do your first test of your EA.
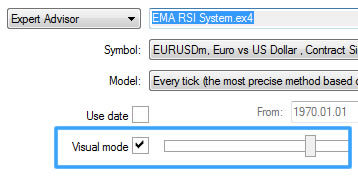
You can choose to either do a backtest with or without visual mode. In visual mode, you can see the trades happening and can control the speed of the test. In normal mode, there is no visual component and progress is tracked by the green completion bar alone.
Visual mode is extremely useful for looking for errors or bugs in your EA.
To select visual mode, tick the button as shown below:
 Tip: You can change the chart appearance in the Strategy Tester visual mode by saving your favorite template with the name “tester.tpl”.
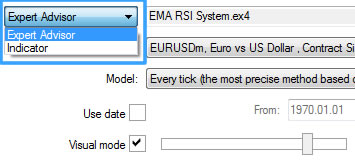
Tip: To visually backtest an indicator, select Indicator instead of Expert Advisor from the dropdown menu:
Once everything is set up to your preferences, click on the “Start button”:
The backtest will now run.
Results
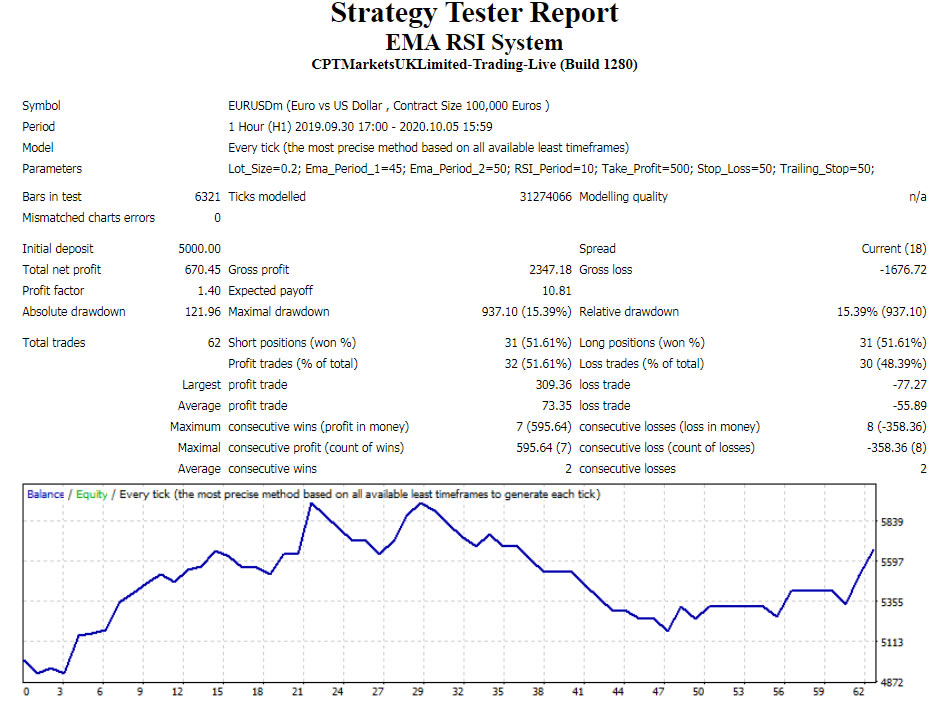
Using the simple EMA/RSI system we used in our example earlier, let’s now take a look at the results on the EURUSD pair on an H1 chart. The settings used are the default variables for the strategy.
In order to view this report, click on the “Report” tab, and right click with your mouse. Now select “Save as Report”:

This is easier to read than using the MT4 report, and we will need to be able to export reports for more detailed analysis, which we will cover later in this course.
The report will save to your specified directory, and will also launch in your default browser as a web page:
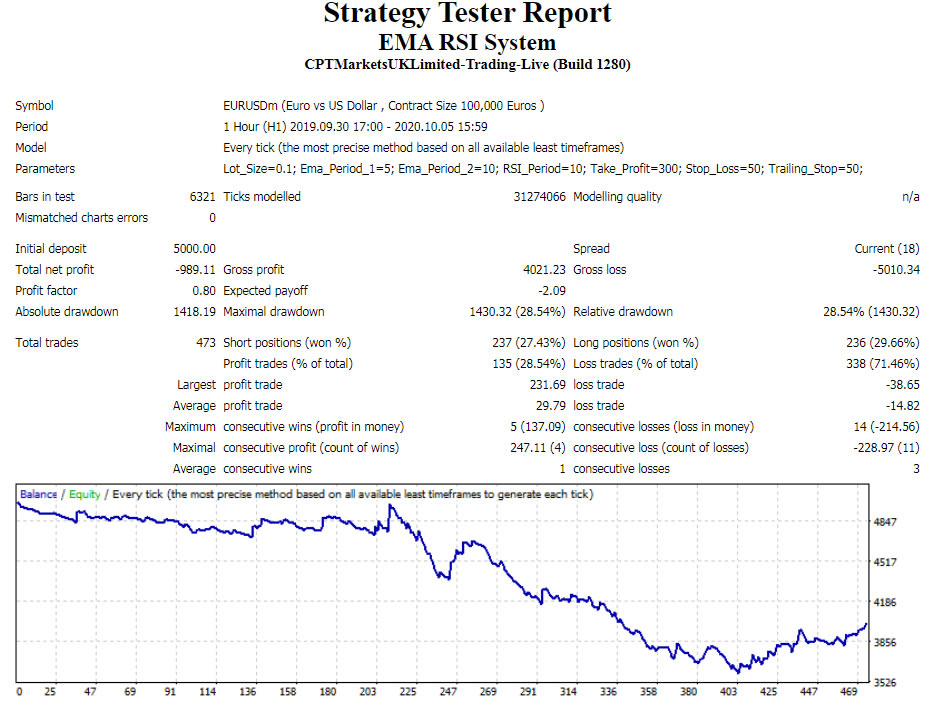
As you can see, the results are not very good. However, it is possible this system still has merit, so we will now optimize the EA’s parameters in the Strategy Tester.
MT4 Strategy Tester Optimizer
The MT4 Strategy Tester uses a genetic algorithm to provide an iterative process in trying different EA settings, and showing you the results.
With the MT4 optimization process, you can specify which parameters to change, and in which combinations, to identify the best settings on the given symbol and backtesting period.
To use the optimizer, click the Optimization box before you start the test:
 The way that MT4 optimizes your EA settings is by allowing you to set a start, step and end value for each of your EA settings. Each EA will have unique parameters depending on the system and indicators used. The simple EMA/RSI EA has the following optimizable variables:
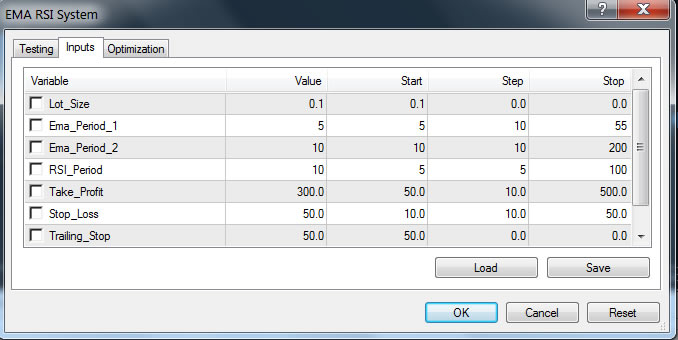
For each setting, you can set the following:
- Checkbox: The parameters that are checked are the ones that will be optimized.
- Value: The default values of the EA. You can also change these to remind yourself of good settings to test around.
- Start: The start value used for optimization.
- Step: The increments that are used in each of the tests. In this example, the steps are set to 5 and 10, so the value for this input will increase by 5 or 10 on each successive test.
- Stop: This is the final value that will be tested during optimization.
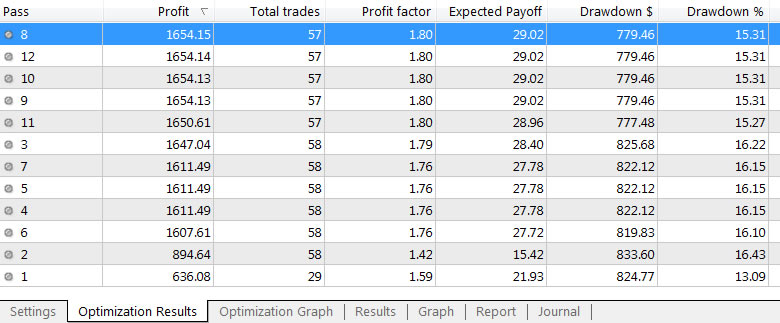
Once you are happy with your settings, press the “Start” button. The Strategy Tester will then run each possible combination of your settings to show you the best ones. Note that there isn’t a visual mode option for optimization. Instead you can see the performance of each optimization parameter combination in the “Optimization Results” tab:
Tip: It’s best to backtest without using every available parameter at the same time. Not only does this potentially take a very long time to optimize, you also run the risk of curve fitting your system.
Once you have run your optimization, you can backtest a setting by right clicking on a result and choosing “Set Input Parameters”:

Tip: The results of your optimization will be available to backtest until you run another optimization or you close MT4.
Tip: Always save your best settings by selecting “Expert properties” > Inputs tab > Save.
As you can see from the below Strategy Tester Report, with some optimization, the system was able to provide a profitable result, although it still isn’t that impressive. Perhaps with some tweaking of entry logic, it may be possible to improve on this system.
We can also backtest the EA on different instruments and time frames.